Containers
TOC
Understanding Containers
Refer to the official Kubernetes website documentation: Containers.
A container is a lightweight, executable package of software that includes everything needed to run an application: code, runtime, system tools, system libraries, and settings. While Pods are the smallest deployable units, containers are the core components within Pods.
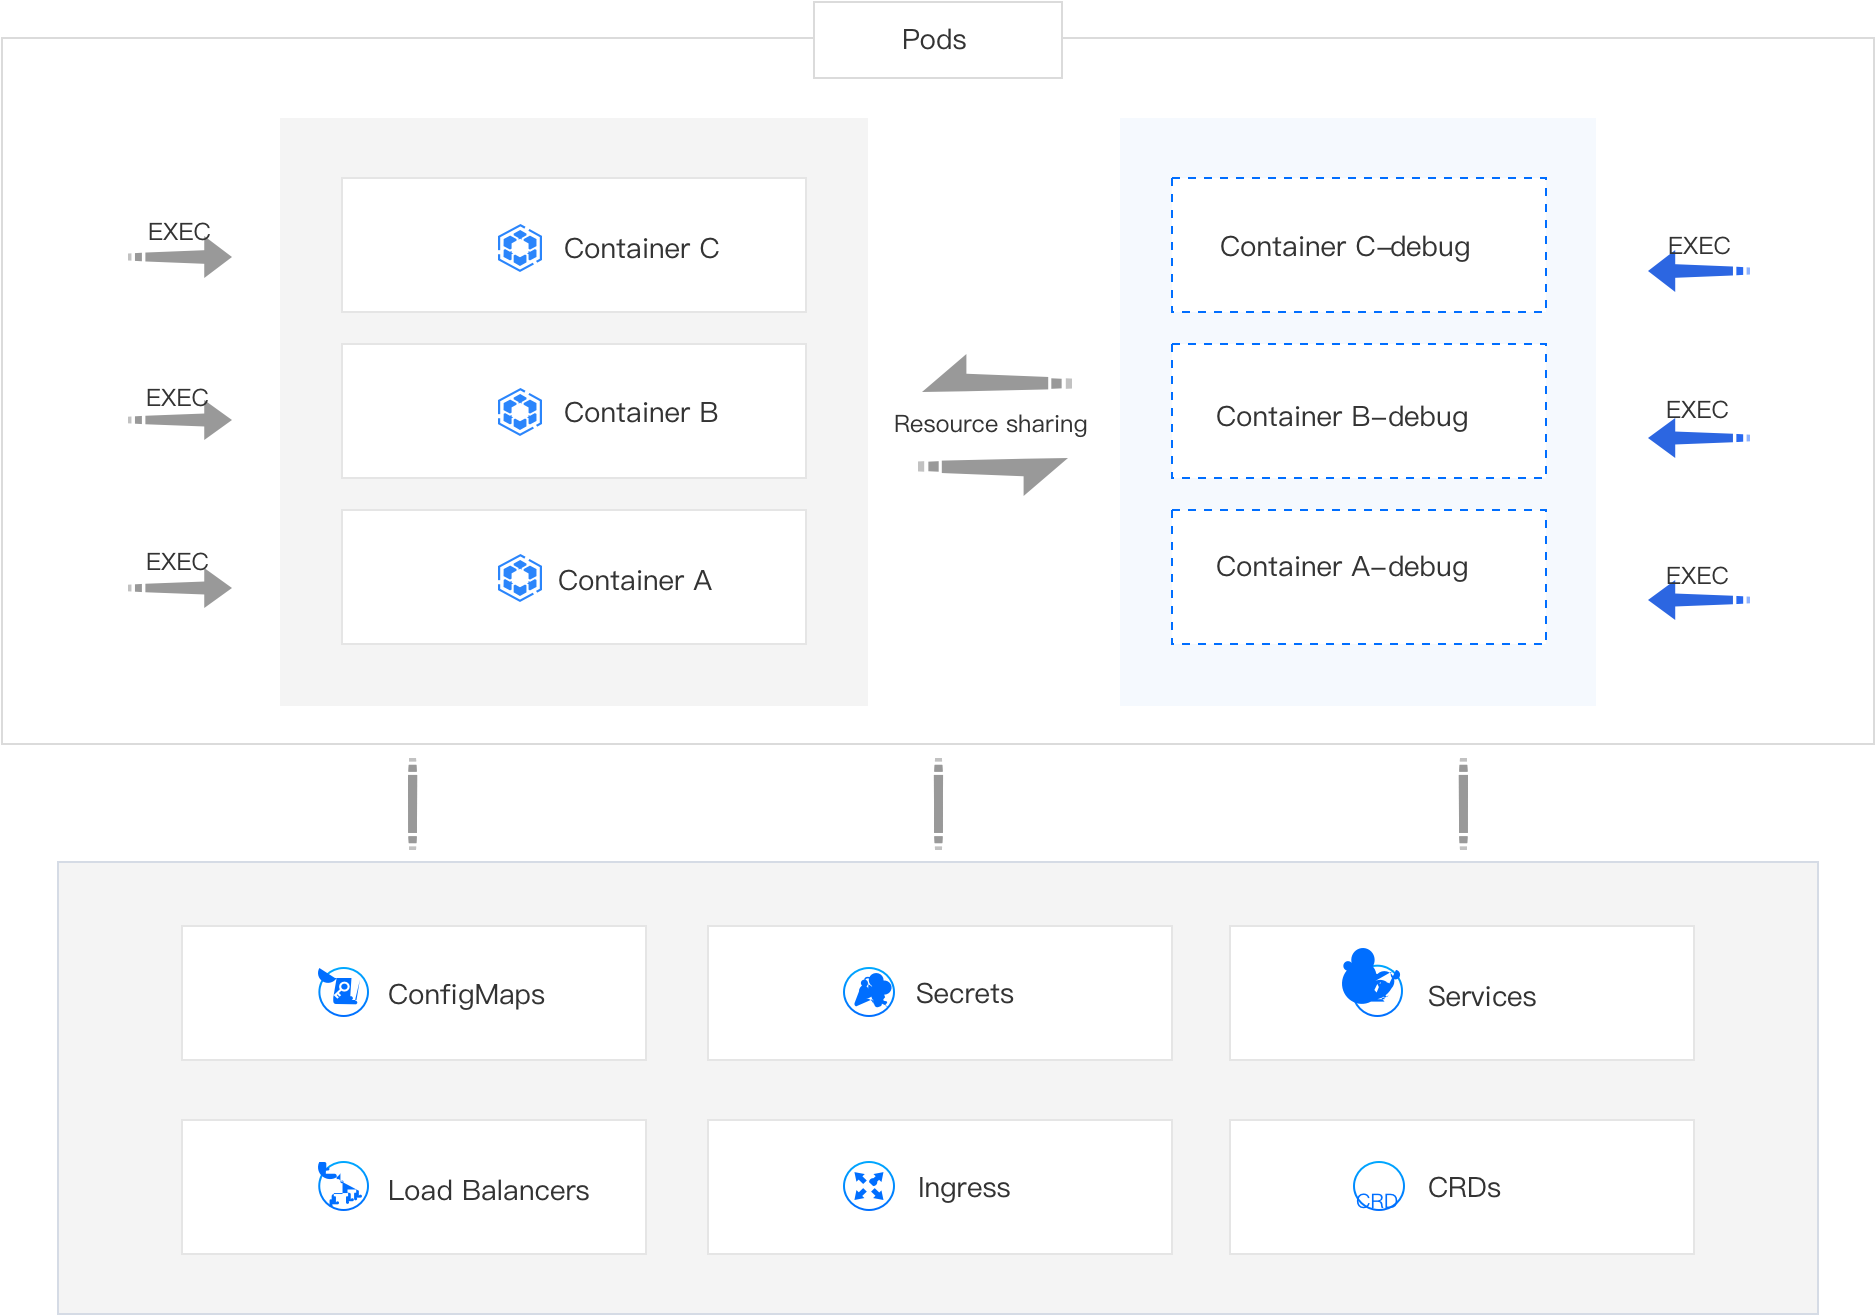
Understanding Ephemeral Containers
Debugging Containers with Refer to the official Kubernetes website documentation: Ephemeral Containers
The Kubernetes Ephemeral Containers feature provides a robust way to debug running containers by injecting specialized debugging tools (system, network, and disk utilities) into an existing Pod.
While you can often execute commands directly within a running container using kubectl exec, many production container images are intentionally minimal and may lack essential debugging utilities (e.g., bash, net-tools, tcpdump) to reduce image size and attack surface. Ephemeral Containers address this limitation by providing a pre-configured environment with a rich set of debugging tools, making them ideal for the following scenarios:
- Fault Diagnosis: When a primary application container experiences issues (e.g., unexpected crashes, performance degradation, network connectivity problems), beyond checking standard Pod events and logs, you often need to perform deeper, interactive troubleshooting directly within the Pod's runtime environment.
- Configuration Tuning and Experimentation: If the current application configuration exhibits suboptimal behavior, you might want to temporarily adjust component settings or test new configurations directly within the running container to observe immediate effects and devise improved solutions.
Implementation Principle: Leveraging Ephemeral Containers
The debugging functionality is implemented using Ephemeral Containers. An Ephemeral Container is a special type of container designed for introspection and debugging. It shares the Pod's network namespace and process namespace (if enabled) with the existing primary containers, allowing it to directly interact with and observe the application processes.
You can dynamically add an Ephemeral Container (e.g., my-app-debug) to a running Pod and utilize its pre-installed debugging tools. The diagnostic results from this Ephemeral Container are directly relevant to the behavior and state of the primary application containers within the same Pod.
 :::Notes
* You cannot add an Ephemeral Container by directly modifying a Pod's static manifest (PodSpec). The Ephemeral Containers feature is designed for dynamic injection into running Pods, typically via API calls (like kubectl debug).
* **Ephemeral Containers** created via the debug feature do not have resource (CPU/Memory) or scheduling guarantees (i.e., they don't block Pod startup or get their own QoS class) and will not automatically restart if they exit. Therefore, avoid running persistent business applications within them; they are strictly for debugging purposes.
* Exercise caution when using the debug feature if the Node where the Pod is located is experiencing high resource utilization or is nearing resource exhaustion. Injecting an Ephemeral Container, even with minimal resource footprint, could potentially contribute to Pod eviction under severe resource pressure.
:::
:::Notes
* You cannot add an Ephemeral Container by directly modifying a Pod's static manifest (PodSpec). The Ephemeral Containers feature is designed for dynamic injection into running Pods, typically via API calls (like kubectl debug).
* **Ephemeral Containers** created via the debug feature do not have resource (CPU/Memory) or scheduling guarantees (i.e., they don't block Pod startup or get their own QoS class) and will not automatically restart if they exit. Therefore, avoid running persistent business applications within them; they are strictly for debugging purposes.
* Exercise caution when using the debug feature if the Node where the Pod is located is experiencing high resource utilization or is nearing resource exhaustion. Injecting an Ephemeral Container, even with minimal resource footprint, could potentially contribute to Pod eviction under severe resource pressure.
:::
Debugging Ephemeral Containers by using CLI
Kubernetes 1.25+ offers the kubectl debug command for creating ephemeral containers. This method provides a powerful command-line alternative for debugging.
Command
Example: Debugging nginx in my-nginx-pod
-
First, ensure you have a Pod running:
-
Now, create an ephemeral debug container named
debuggerinsidemy-nginx-pod, targeting my-nginx-container, using thebusyboximage:This command will attach you to a shell inside the debugger ephemeral container. You can now use busybox tools to debug my-nginx-container.
-
To view the ephemeral containers attached to a Pod:
Look for the
Ephemeral Containerssection in the output.
Debugging Ephemeral Containers by using web console
-
Container Platform, and navigate to Workloads > Pods in the left sidebar.
-
Locate the Pod you wish to view, and click ⋮ > Debug.
-
Choose the specific container within the Pod you wish to debug.
-
(Optional) If the interface prompts that initialization is required (e.g., for setting up necessary debug environment), click Initialize.
INFOAfter initializing the Debug feature, as long as the pod is not recreated, you can directly enter the Ephemeral Container (for example, Container A-debug) for debugging.
-
Wait for the debugging terminal window to become ready, then begin your debugging operations. Tip: Click the "Command Query" option in the upper right corner of the terminal to view a list of common debugging tools and their usage examples.
INFOClick the command query in the upper right corner to view common tools and their usage.
-
Once debugging is complete, close the terminal window.
Interacting with Containers
You can directly interact with the internal instance of a running container using the kubectl exec command, allowing you to execute arbitrary command-line operations. Additionally, Kubernetes provides convenient features for uploading and downloading files to and from containers.
Interacting with Containers by using CLI
Exec
To execute a command inside a specific container within a Pod (useful for getting a shell, running diagnostic commands, etc.):
-
Example: Getting a Bash shell in the
nginxofmy-nginx-pod -
Example: Listing files in
/tmpof a container
Transfer Files
-
To copy files from your local machine to a container within a Pod:
-
To copy files from a container within a Pod to your local machine:
Interacting with Containers by using web console
Entering the Container through Applications
You can enter the internal instance of the container using the kubectl exec command, allowing you to execute command-line operations in the Web console window. Additionally, you can easily upload and download files within the container using the file transfer feature.
-
Container Platform, and navigate to Application > Applications in the life sidebar.
-
Click on Application Name.
-
Locate the associated workload (e.g., Deployment, StatefulSet), click EXEC, and then select the specific Pod Name you wish to enter. EXEC > Contianer Name.
-
Enter the command you wish to execute.
-
Click OK to enter the Web console window and execute command-line operations.
-
Click File Transfer.
- Enter an Upload Path to upload local files into the container (e.g., configuration files for testing).
- Enter a Download Path to download logs, diagnostic data, or other files from the container to your local machine for analysis.
Entering the Container through the Pod
-
Container Platform, and navigate to Workloads > Pods.
-
Locate the target Pod, click the vertical ellipsis (⋮) next to it, select EXEC, and then choose the specific Container Name within that Pod you wish to enter.
-
Enter the command you wish to execute.
-
Click OK to enter the Web console window and execute command-line operations.
-
Click File Transfer.
- Enter an Upload Path to upload local files into the container (e.g., configuration files for testing).
- Enter a Download Path to download logs, diagnostic data, or other files from the container to your local machine for analysis.